Amazon Books For Your Reading Needs

Wednesday, October 28, 2009

Living with Country Antiques: Fixing a Table with a Sticky Top


Living with Country Antiques: Fixing a Table with a Sticky Topby priceminer (09/29/09).

http://www.worthpoint.com/author/priceminer


When trying to clean a country farm table, if simple soap and warm water doesn’t work, don’t despair, there are other options.
I received a letter from a reader, asking about a country farm table with a particular problem:
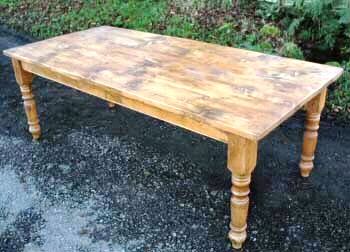
“We found it at an outdoor antiques show last fall. It sat in our garage until this spring, when we finally were able to use our new room. We didn’t cover the table because the garage is clean. Plus, we thought we’d be in the room sooner than we were. Anyway, the tabletop is so sticky with something; we really don’t even want it in our house! I didn’t notice that when we bought it. But, I didn’t check carefully because the table was the right size, and we loved it. Now, I don’t know what to do to make it usable. The top is pine, three boards wide, and doesn’t seem to have a finish on it. It’s a great color with wonderful patina. So, I don’t want to refinish it. Can you make any suggestions about what we can do to make the surface fit to use?”
This sounds like a nice table with a typical problem. Without seeing it, I would guess the top has years of wax, spilled food, and any number of other elements, which could become sticky. I’m fairly sure it didn’t happen while the table was being stored in your garage. You are right about not refinishing it. There is no need to be that drastic. Also, you’d ruin a lot of its charm if you refinished the top.
What you need to do is clean it. From your description, I doubt that simple warm water and soap will work. But have you tried that? When cleaning something like this tabletop, always begin with the simplest, least aggressive method. So, start with the easiest. Try washing the surface with dish detergent in very warm water, using a kitchen sponge: Scrub the wood with this soapy water. Then, rinse the surface with cool, clear water and wipe it dry. If you’re lucky, this will work, but don’t expect it to!
The next step is to try cleaning the top using vinegar. Pour some cheap, white vinegar into a plastic container. Then dip in a sponge and scrub the tabletop. Try cleaning one board at a time, going from one end to the other. Next, rinse with clear, warm water. After rinsing, wipe the surface dry. If that doesn’t do the job, go on to the next, more drastic method: cleaning with household ammonia.
When using ammonia, work outdoors or in an open area with good cross ventilation. I’m not sure inhaling this stuff is good for you. But, regardless of that, it’s very unpleasant. I use ammonia a great deal. It shouldn’t damage your pine top. However, to be on the cautious side, first test an area on the underside: Pour some ammonia into a plastic container. Then, with a pad of steel wool, rub the test area.
Rinse with cool water and wipe it dry. Allow the surface to completely dry before deciding whether or not to use ammonia on the top. It should be all right. But, it’s always better to check first to know you aren’t going to discolor the wood. Clean as you would with vinegar, one board at a time. Then, rinse with clear, cool water and wife dry.
The problem with the top probably is a combination of things. Along with the stuff I already mentioned, sitting in the garage possibly helped cause some of the stickiness. However, that doesn’t matter. What’s important is getting the surface usable and keeping it that way. You didn’t mention the base. I assume it isn’t suffering from the same problem. If it is, try cleaning it the same way, beginning with the least aggressive method.
If you’re able to clean the top with soapy water or vinegar, do the following: once the top is clean and thoroughly dry, use steel wool to lightly rub with the grain of the wood. Be especially careful that you don’t run into splinters. It’s easy to pick them up with steel wool. If you are rubbing vigorously and hit a splinter, it could do some real damage to your finger or hand. Be particularly careful where the boards join. Always check for loose wood, which could become a damaging splinter, before you start rubbing.
The reason for rubbing with steel wool is to take care of any raised wood grain, which the washing may have caused. Once the surface is smooth, apply a coat of good paste wax. If the top is fairly light in color, use white, or clear, wax. If the wood is dark and has lots of patina, use a darker or tart-colored wax. Apply it with a lint-free cloth. Then, buff the surface with a brush like one you would use on shoes. Once this has been done buff with a rag such as an old bath towel, rubbing with the wood grain. Again, be careful of splinters.
If you had to use ammonia, scrub the wood with white vinegar afterward. This will help wash away any ammonia residue. If all of this liquid washing has caused the grain of the wood to rise a great deal, you may have to sand the top. Water doesn’t always make grain rise, especially on old, well-worn surfaces like farm tabletops. However, after all of the scrubbing, if the wood feels like it has sand or grit on it, sand it with a fine sandpaper. I would use 120 grit. Then, depending upon how the surface feels, you either can use steel wool or proceed right to the wax. If it’s smooth after the sanding, skip the steel wool.
Once the top has been waxed, you shouldn’t have any more sticky problems. All you will need to do to care for the surface is wipe it after every meal with a damp, not wet, cloth. If something is spilled, wipe it up right away. Depending upon how hard you are on the top, you will need to wax the surface only once a year. I would do it each spring or early summer, before the arrival of higher humidity.
If you are watchful about spills and protect the surface from hot containers right out of the oven or off the grill, there is no need to coat the tabletop with anything other than wax. After all, it isn’t a Chippendale banquet table! Enjoy the simplicity of this country piece!
— by Lew Larason

Saturday, September 26, 2009

Regular Maintenance for Antique Furniture – a List of ‘Should Do’s’

Regular Maintenance for Antique Furniture – a List of ‘Should Do’s’
by Fred Taylor (09/22/09).

Over the last 30 years of repairing and restoring antique and collectible furniture, many questions have come from my customers about the little things that should or should not be done on a regular basis to care for their prize possessions. Much of this information is just “common sense,” but many of us are so busy in our everyday lives that we don’t have time to worry about the details. Here’s the first installment (of two) of a short guide to remind you of the “little stuff” that may help prevent your having to spend money on the “big stuff.”

Things you SHOULD do:

Custom made table pads have a heat resistant core, a soft “meet the furniture” side and a waterproof upper crust.
• Wax your furniture. The basic care of furniture in relatively good condition includes cleaning with mineral spirits (paint thinner to remove old dirt, wax and oil—no it won’t hurt the existing finish, different chemistry). After wiping down with spirits allow the piece to dry overnight. Then apply a thin coat of paste wax; BriWax or Howard’s works well. Use tinted wax to enhance the color. After that, dry dust only. Reapply wax once a year. Do not use any other polish and do not use product that contains oil of any sort or silicone—nothing but paste wax. Period. Also remember that the grocery store does not sell any product that has to do with furniture maintenance.
• Rotate your dining room table once a year. Pick a date, like your birthday or a holiday and turn the table around. You can also do this with your breakfast table, kitchen chairs, even the family room coffee table. Remember that furniture exposed to strong light will fade and the finish may even start to disintegrate. Excessive wear from using one spot more than another, on a dining table or coffee table for example, will decrease the life of your furniture and may require you to spend big money to repair the damage. Also consider covering your furniture with sheets or closing curtains or blinds in bright rooms that you are not using, especially when you are going to be away from home for awhile.
• Put felt cloth or discs beneath lamps, vases and other decorative items you set on your furniture. Since the bottoms of brass lamps etc. are rarely silky smooth, the felt may save your furniture from being scratched and the finish damaged. Felt can even be purchased in pre-cut shapes so the whole project may only take a few minutes. This also works to protect hardwood floors from the tips of your furniture.
• Use two people to move the bed. Sometimes beds have to be moved to clean under and around them and at that time they are at risk. Over the years, we have repaired many beds that one person had attempted to move alone. The usual outcome is a broken or severely weakened bed frame. The bedposts usually crack or break where the side rails fit in to the headboard or footboard. Sometimes the rails themselves break or lose the metal fittings embedded in the ends. It is very difficult if not impossible for one person to move a bed without stressing the joints.

A piece of glass almost always has a microscopically thin layer of moisture on the surface. This moisture will “grow” to the finish on furniture sticking the glass to the piece resulting in finish damage when the glass is removed. Allowing air to circulate under the glass using spacers like this clear disc eliminates that problem.
• Purchase glass cut to size for the tops of your night stands, end tables or coffee tables. This is especially important if you tend to set glasses on your furniture or entertain frequently. You can make a pattern or have a glass company come out and make a pattern. This will add years to the life of the furniture. Also, don’t forget to use clear plastic discs (about the size of a nickel and available from the glass company) between the furniture and the glass so that the finish can breathe.
• Invest in proper table pads to cover your dining room table. Put a tablecloth over the pads and THEN you can use placemats or other coverings if you choose. Lots of folks think that putting a table cloth directly on the table is enough protection. Unfortunately the moisture from a glass or the heat from a casserole dish will go right through the tablecloth (or a placemat) and into the finish on the table. Remember that your guests are there to enjoy your company and not to look at the dining table so cover it and protect your investment.
• Purchase a can of silicone lubricant. If possible try to find “food grade” silicone from a fabric or hardware store. (You can find it here.) Use this spray when you have a dresser drawer that is giving you problems each time you open and close it. Pull out the problem drawer and make sure that the wooden runner is not completely worn down or that a part isn’t missing. Then by simply spraying the bottoms of your drawers on the runner and the corresponding case runner(s), you will find the drawer will open and close more easily. Beeswax works as well for this application but once you buy a can of silicone you will find 1,000 other uses for it.
• Take a video or photographic inventory of your household goods. Hire someone to do this for you if you have to. This way you will have a record of your belongings should you have a personal emergency. Keep a copy of the video or photos on a disk in a safe deposit box or family safe. Also consider having any valuable furniture appraised by a certified appraiser. Keep a copy of the appraisal and pictures in a safe place. You may need to consider purchasing additional contents coverage on your homeowner’s policy based on the appraisal results.
• Visit the craftsman. If you are considering having a piece of furniture repaired or restored, go visit the location of the business you are planning to use. Ask to see some of the work in progress and ask for and follow up on references. Always give the shop a match drawer, door or whatever you want your piece to resemble when it is finished. This will help the shop determine the color and sheen for the restored piece.
• Number all the drawers in a chest of drawers, dresser or buffet. That way the next time you move, you won’t have to worry about where each drawer fits. Also remove keys and pack in a safe place.

Most good libraries have an abundance of furniture reference books. Take advantage of them but don’t believe everything you read. Be selective.
• Read all you can to learn more about your furniture. The library is full of books covering periods, styles and ages and learning the history of how, when, where and what materials were used to make a piece of furniture can add to your enjoyment of the piece. A suggested antique furniture reading list is posted on my Web site: How To Be A Furniture Detective. Just scroll down half way.
• Find someone knowledgeable about furniture and let that person be your guide. That person may be a dealer you trust, a craftsman who has done good work for you or just a friend but whoever it is make sure they know more than you do about furniture. That way when you have an important decision to make, you already have a place to seek guidance.
Next time a list of DON’TS.
——————————–
Fred Taylor is a antique furniture Worthologist who specializes in American furniture from the Late Classicism period (1830-1850).
Visit Fred’s website at http://www.furnituredetective.com/. His book “How To Be A Furniture Detective” is now available for $18.95 plus $3 shipping. Send check or money order for $21.95 to Fred Taylor, PO Box 215, Crystal River, FL 34423.
Fred and Gail Taylor’s DVD, “Identification of Older & Antique Furniture,” ($17 + $3 S&H) and a bound compilation of the first 60 columns of “Common Sense Antiques,” by Fred Taylor ($25 + $3 S&H) are also available at the same address. For more information call 800-387-6377, fax 352-563-2916, or e-mail info@furnituredetective.com.

Friday, September 18, 2009

Leave your boots at the door, Jack

Leave your boots at the door, Jack
January 14, 2009by Harry A. Zuber


Boot jacks shaped as pistols.
The boot jack is a utilitarian device used to remove boots. The many designs patented during the last half of the 19th century show a pride in how items looked as well as how they worked. Thus we have an American art form that has survived to the present day.


There were 239 boot jacks patented in the United States between 1852 and 1995 to inventors in 37 states, the District of Columbia, Austria, Canada, England, Germany, India and Japan. We find wonderful examples of boot jacks made from cast iron, wood and brass. There are many examples of one-of-a-kind boot jacks as well as those produced in mass quantities. They were especially popular advertising and promotional tools. Examples marked “Phelps Dodge & Palmer Chicago,” “Use Musselmans Boot Jack Plug Tobacco,” and “The Glover Boot and Gaiter Jack Paterson NJ” were given away by various companies. Significant information about boot jacks remains scarce.

The maker often did not mark the item with information on the origin, name or date of manufacture, which makes it difficult to determine the date and place of production. The most common boot jack is the “cricket,” with two antennae coming out from the top of the head to form the place for the heel of the boot. At least two foundries were producing these in the 1860s and 1870s. Harbster Bros. & Co., Reading, Pa., was listed in “The Business Director” of 1869-70 as a producer of sad irons and miscellaneous hardware. It produced a cricket with its name on the underside. One of these was found at an antiques cooperative in London, England, where the dealer had marked it as originating in Reading, England. Daniel Kidder of Rumney, N.H., is best known for building the first engine used on the Mount Washington (N.H.) Cog Railway. His foundry (circa 1860) also produced a cricket boot jack bearing his name on the underside.

Another common form of boot jack is the “Naughty Nellie,” a risqué item in the shape of a woman on her back with her legs up to receive the heel of the boot. It has been produced in many sizes and with varying amounts of anatomical detail.The heart is a shape that has been cherished over the generations and is often found in both cast-iron and wooden boot jacks. A wooden heart-shaped boot jack of Pennsylvania origin can also be found hanging in Andrew Wyeth’s former studio, now a museum in Chadds Ford, Pa. There is a beautiful brass boot jack in the collection of the Winterthur Museum in Wilmington, Del., that was created by the DuPont family. One interesting boot jack producd in the early 20th century is a depiction of “Foxy Grandpa,” a comic strip character created by C.E. Schultze that first appeared on the front page of the New York Herald Sunday comics section on Jan. 7, 1900, and had disappeared by the Depression.

Also at this time, Colonel George W. Miller owned a very large ranch in northeastern Oklahoma which he named the “101 Ranch” for the highway that ran through it. This was a working ranch but became famous for the 101 Ranch Wild West Show, which gave non-Westerners a hint of the color and romance of the soon-to-disappear frontier. Souvenirs were good money makers and included a boot jack in the shape of a steer head with “101 Ranch” in raised letters on it. These have been reproduced through the years, but the originals are quite valuable today, as are any original items from the 101 Ranch.


Many of the boot jacks patented in the 19th century were never put into production, and some that were had only limited output and remain very rare today. The U.S. Patent Office decided some years ago to dispose of its patent models in an effort to save space. This is unfortunate for Americans with an interest in the history of inventions in this country, for we lost many fine examples of them. It is, however, good news for collectors, as quite a few of these disposed-of items found their way into private hands. All the boot jack patent models that were disposed of by the Patent Office were bought by enterprising individuals. Sadly, a fire at a warehouse where many were stored destroyed many of these boot jack models.


As with so many collectibles, boot jacks are heavily reproduced. Fine castings and carvings are getting more difficult to find and prices have risen steadily for the best examples. There are many of the more common earlier examples still available at reasonable prices. Collectors can find good examples at antiques shows, live auctions and occasionally at Internet auction sites (on any given day eBay has as many as 50-60 different listings). It is clearly desirable to be able to hold one in your hands to determine the quality of the item, however, before the purchase is made since many that are found are lightweight, low-quality reproductions.Click here to discuss this story and more in the AntiqueTrader.com message boards.

Friday, September 4, 2009

Sheffield and Silver Plate: What to Look For
by priceminer (07/14/09).

http://www.worthpoint.com/author/priceminer

The social background for the discovery of the methods of plating on copper used in the Sheffield process is quite interesting. It was a time of rising expectations for an emerging merchant class distinct for the upper class in England. These newly wealthy families wished to live with silver luxuries befitting their new status. Unfortunately for them, solid silver hollowware objects were totally beyond their means. Only the aristocracy could afford sterling silver tureens, vegetable dishes, trays and the like. But that didn’t keep the merchants from wanting these objects. In 1742 a discovery credited to Thomas Boulsover of Sheffield led to the Sheffield plating business.

Elegant Opaline glass & silverplated butter keeper, circa 1870, in Classical Taste by Joseph Rogers of Sheffield, England.


Boulsover discovered that when sterling silver is fused to copper the two metals are identically malleable. One could pound out a piece and have the silver and copper retain the same geometric ratio to one another as the metal was worked. This led rather quickly to the development of a very large industry based on the fusing of ingots of sterling silver to one or both sides of ingots of copper. The new merchant class—and down on their luck members of the aristocracy—could now have terrific pieces of hollowware that appeared to be made from sterling silver but were in fact made of thinly veiled copper!
The keys to identifying Sheffield silver are strictly related to the method of its manufacture and the need to disguise the underlying copper. Because the silver, not the labor, was the expensive part of the process, large pieces of Sheffield silver were tinned rather than silvered, on unseen surfaces.
Areas such as the inside of a meat over or the bottom of a large tray, even the bottom of a large tureen, will often be tinned, not plated. When you find such a tinned area on a piece you know for a fact that it is old Sheffield plate, unless it’s a tinned bottom added to electroplate with rolled edges. Than you have a fake Sheffield!
Another major characteristic of Sheffield plate is that all exposed edges must be covered with a rim of silver, otherwise the copper middle layer would show through, giving away the fact that the piece is not sterling silver. This is referred to as a wrapped edge. Either one of two processes were used: the applied silver decorative motif was bent over the edge; or a thin silver band was wrapped and fused around the edge. In both cases you can get a fingernail virtually under this edge. You will also find a seam where the ends of the strip of silver or applied moldings meet.
In the 18th and 19th centuries, most families purchasing large pieces of hollowware had their family crest engraved on the item. If you were to engrave a piece of Sheffield plate, the copper would show because of the thinness of the silver layer, Engraving shields or plaques were therefore inlaid into the side of the piece in the appropriate spot for engraving, If you blow air either at the engraved area or at the appropriate areas on an un-engraved piece, the engraving shield will “jump out” at you. This is caused by the differing rates of condensation on the solid silver plaque versus the plated areas. Any piece with an engraving plaque will invariably turn out to be Sheffield plate.
On any item formed out of a cylinder of metal, such as candlesticks, pots, vases and so on, the metal was joined together by crimping or dovetailing. This left an obvious seam, often with a little copper showing. Originally this was carefully burnished, but with a couple hundred years of wear and tear, you can often spot such seams. The presence of these seams is a guarantee that the items are old Sheffield.

Pair of late 18th century Sheffield Plate Candlesticks engraved with a shaft of wheat and inscribed with the Latin words, “Sapiens Qui Assiduus,” which means “He who is wise is industrious.”
There were many fascinating processes involved in the making of fused plate, well beyond those mentioned here. They do not, however, leave any telltale marks that specifically identify a piece as Sheffield plate as opposed to solid silver or electroplate. You can learn most readily about those processes by reading the major books that details all of the processes involved in the creation of fused plate.
The value determinants of Sheffield silver are similar to those for all antiques, but with some exceptions. Aesthetic factors are identical to those for similar pieces of sterling silver. Provenance and rarity also have an impact on value. The originality of the pieces making up a multi-part piece, such as covered vegetable or entree dish with a separate water reservoir, is crucial to value on Sheffield pieces, as it is to all sterling or electroplated items.
Anything made in multiples and of more than one part had each separate piece numbered in a series. Thus, you would have cover, dish and under tray number one, number two and so on. Because the pieces were not always perfectly compatible, the numbering system allowed servants to get the correct cover on the correct base. If the pieces no longer are three to three, or one to one, but are cover three with base four, then an incestuous relationship has developed, and the value is no more than 75 percent of a completely original piece. Marriages of work by two makers would have even less value, perhaps only 25 percent of the value of a perfect piece.
Approximately 90 percent of Sheffield silver pieces are completely unmarked. In fact, the lack of marks can often make one first think an item might be a piece of Sheffield plate. In the very early days a few makers put on pseudo-hallmarks to suggest the high quality of their goods. The guilds of silversmiths sent up an immediate howl and Parliament quickly established severe penalties for the hallmarking of plated wares. As the companies making Sheffield plate grew stronger, they began to lobby for some allowable marking systems, and the end result was that either the name or a small symbol could be used as an identification device. Because marked pieces are rare, a premium of 25 percent or more adheres to a marked price over an identical unmarked piece.

Regency period (circa 1810-1820) Old Sheffield Plate tea caddy. This pieces shows quite a lot of bleeding (wear to top of lid) where the copper is showing through.
Finally, and of utmost importance to value, is the level of originality of the actual plating. Old Sheffield silver is often in remarkably good condition with little or no bleeding (copper showing through). This is because it is the unique property of Sheffield plate that it is sterling silver over copper (not pure silver, as is the case with both close plate and electroplate). Remember, sterling is an alloy and the point of making an alloy is that it is hundreds of times more durable than pure silver: Whereas as pure silver wears away quickly with regular polishing, sterling wears away very, very slowly.
Related to this condition problem is the question of electroplating old Sheffield plate. Never do it unless the condition is so bad that the piece has no value as an antique. Electroplating adds a process totally foreign to the early piece, and it covers the mellow sterling with the more harshly colored pure silver.
In approximately 1840, the Elkington Company of Birmingham England, began production of electroplated silver. They had cleverly bought up all patent rights related to the experimentation then taking place throughout England in addition to their own work. This far simpler method—by which a completed base metal object is suspended in a vat, a charge introduced, and pure silver fused onto all surfaces—quickly put the old method out of business.
Electroplated wares are coated with a thin layer of pure silver, which, as noted earlier, wears away far more quickly than an alloy would. The base metal also impact on adherence, the preferable based metals being copper, brass or nickel-brass alloy (commonly called nickel silver). Britannia and other similar white metals are inferior because they lose their shape more readily and because they provide a poor base for the silver to adhere to.

Sheffield plate Corinthian column candlesticks, made by Hawksworth & Eyre, Sheffield, England, circa 1870's. This is an example of electroplate.
Electroplated items lack all of the distinctive aspects discussed in the Sheffield section. They are commonly marked by their makers and usually have marks indicating the quality of the plating and the type of base metal. Marks commonly seen include EP (electroplate), EPNS (electroplated nickel silver), EPBM (electroplated Britannia metal), A-1, quadruple plate, triple plate, and so on. As with all silver, value is influenced by age, rarity, desirability of style and type, provenance, condition, and additionally, by base metal used.
Because they were competing with the old Sheffield platters who had earned wonderful reputations for the fine quality, the electroplating companies have often used the word Sheffield in their company names or as a descriptive adjective for their plating. Thus one sees on objects such words and phrases as “Sheffield, England,” “Sheffield Silver on Copper,” “Sheffield plate,” “Sheffield silver,” and so on. In each and every instance the word “Sheffield” on a piece of silver is your absolute, iron clad guarantee that the piece is electroplate, having nothing in common with the magnificent pieces of genuine old Sheffield plate.
— by David Lindquist
—————————————
David Lindquist co-owns Whitehall at the Villa Antiques and Fine Arts in Chapel Hill, N.C., and is a nationally recognized lecturer, appraiser, author, editor and broadcaster

Friday, August 14, 2009

How to Detect Repaired Porcelain, Art Pottery & Clay Pieces

Found this great article on how to detect repaired pottery. Mr Eisele shares his expertise. Visist his website for more information.
Old World Restoration

How to Detect Repaired Porcelain, Art Pottery & Clay Pieces
by priceminer
by Douglas Eisele


Chips on the top rim of this Weller Art Pottery vase were professionally restored by Old World Restorations, Inc., Cincinnati, Ohio.

The repairs are invisible to a cursory glance. Which is why one needs to be on the lookout for repaired porcelain, art pottery and clay pieces.

Antiques and collectibles enthusiasts often find themselves frequenting community charity auctions, local antique shows, neighborhood garage sales and internet web sites searching for their next “Great Find.” But buying from someone you don’t know—and may never be able to find again—is sometimes risky business.
For collectors of different types of ceramic art, including porcelain figurines, art pottery and clay sculpture, one of the issues facing them is the fact that chipped or broken porcelain can be professionally restored so that the damage is no longer visible. But the pieces may not always be marked as such.

So, how can one know if an item has been damaged and restored?
There are different methods and types of equipment used by conservators to detect invisible restoration of ceramic objects. Ultraviolet (UV) light is used to examine the surface of an object and to reveal adhesive residue or any substances that may have been applied over the original surface to mask damage. X-ray can also be used to show fractures that have been invisibly restored. If allowed, a collector can usually have art and antique items inspected by an experienced conservator or museum conservation lab.

But if your are standing in the middle of a flea market, holding a piece you might be interested in buying, knowledge and experience are probably the most valuable tools with which collectors can equip themselves when inspecting and buying ceramic art. It is important to learn as much as possible about the objects’ nature and composition and be able to confirm that it has the proper shape, size, design and glaze. Even when buying from reputable auction houses and dealers, one should still have a basic knowledge of the methods and materials that were used to create the object.

Don’t be afraid to ask the seller questions like: “How and when did you acquire the object?” “Have you thoroughly examined it for damage and repairs?” and “Are you willing to document the condition in writing and provide a money back guarantee if it differs from your representation?” (Answers to these questions are especially important when buying over the Internet).
Pair of early porcelain candlesticks with old discolored repairs, small chips and missing leaves. This damage is difficult to see on a photo posted on an Internet listing.


I recommend a visual inspection of the object in direct sunlight. Look for inconsistencies in the color, decoration and glaze. When a damaged ceramic object is restored, it will usually have some type of clear non-fired coating applied over the repair to mimic the original surface glaze. In some instances, this “simulated glaze” is applied over the entire surface. Unlike original fired glazes, new acrylic coatings often contain lint or dust particles that can be seen with the naked eye under direct sunlight.
Some original ceramic glazes exhibit a network of fine cracks know as “crazing.” These small surface cracks should not be restored and are nearly impossible to replicate when completing a restoration in an area of an object that is crazed. If an object has visible crazing, look for inconsistencies or the absence of crazing in suspicious areas that may indicate a restoration.

Carefully run your finger along the edges to reveal any rough spots or chips that may be hard to see. Some vases and flat objects can be lightly tapped with your finger or a straight pin to check for structural cracks. A cracked object will not “ring” like a bell when tapped.
An Imari porcelain plate with old repairs and rim chips that are easily visible to the naked eye.


I also suggest that you carry a small straight pin with you when shopping for ceramic objects. With the permission of the seller, carefully and lightly “touch” the point of the pin to the surface of the glaze where you suspect a restoration. The pin will easily slide across the glasslike surface of original fired and un-restored glaze; however, it will not slide across, and may even sink into, the simulated materials used to restore the damage. Be careful not to scratch or damage the glaze or the restoration. Some claim that a similar test can be done by touching a suspected area of an object to your teeth to reveal a difference between original and restored glazes.
Before you buy:

• Do your homework and know what it is that you are looking at• Research basic restoration and conservation techniques• Ask the seller questions to document an objects history and condition• Conduct thorough inspections in good light• Consult an experienced art conservator or museum• Ask for written money-back guarantee

Wednesday, August 5, 2009

Factory Decoys Offer another Collecting Avenue


There are as many strategies to collecting decoys as there are decoys. For example, one can collect by area made, maker or species. One popular area of decoy collecting is the factory-made decoy. Factory decoys are those decoys commercially made by machine and advertised for sale in sporting magazines. This really began around 1870, due to the high demand for decoys during the explosion of market gunning. Many wood decoys were turned out on a lathe at a time then the detail carving was finished by hand. Hand- or spray-painting finished them.
One exception to the rule in machine production are the decoys made by Harvey Stevens of Weedsport, NY. These decoys were handmade starting in the 1860s. By the 1880s, they were being advertised for sale in national magazines. These decoys have always been considered by collectors to be factory decoys because of this advertisement. At the height of his business, Stevens employed eight men in the carving and painting of these decoys. They have a style all their own and are quite collectible, selling for thousands of dollars in good condition.

These four Stevens decoys, two goldeneye drakes, top, and a bluebill drake and hen, bottom, are in superb condition. They ranged in price from $7,500 to $10,250 at auction. Photo courtesy of Guyette and Schmidt.
Another early factory, owned by William J. Mason, made decoys that are probably the most popular factory decoy for collectors today. Mason began business in 1896 in Detroit, Mich. and closed doors in 1924. This definite and short period of production is very attractive to collectors. The decoys were machine-turned on a duplicating lathe then the details were hand carved. The paint was also hand done in a very attractive style. They came in five quality grades, premier grade, challenge grade, No. 1 glass eye, No. 2 tack eye and No. 3 paint eye. Today, a premier grade bluebill drake in good condition goes for $1,000 to $2,500 at an in house auction. And a No. 2 tack eye bluebill drake goes for $400 to $600 in good condition. Rare models, rare species or exceptional condition can bring these prices up exponentially.


Mason premier grade bluebill drake (top) and paint eye bluebill drake (above). Note the scalloped paint swirled on the breast of the premier grade decoy and the straight, plainer paint on the paint eye decoy. Photos courtesy of Guyette and Schmidt.
William E. Pratt Decoy Co. bought Mason’s patterns and equipment when it closed the factory doors in 1924. Pratt was later bought out by the Animal Trap Co. of America in 1939. They made decoys under the name of Victor until the mid 1960s with a hiatus during World War Two. The Pratt decoys were similar in looks to the Mason, but never had the style or quality. The circular blade marks from the duplicating lathe were left on Animal Trap’s Victor instead of hand carving them smooth. Very simple painting was at first done by hand then by airbrush. The Victor decoy is very easily identifiable and makes an inexpensive first decoy.
One other factory I will mention here is the Wildfowler Decoys of Saybrook, Conn. This company manufactured truly lovely decoys. They made many species and many models of decoys. They also had two finishes; No.1 was hand -painted with feathering, and the No. 2 model was spray-painted and called the gunners model. The decoys were made from white pine until WWII. The company produced gunstocks for the government during the war. After the war they began using government surplus balsa wood for the bodies and white birch for the heads. There were three other owners of Wildfowler Decoys at three other locations before the company closed in 1993. Each had its own brand that can help the collector with dates and locations.

A Wildfowler blackduck decoy is on the left and a low head pintail drake is on the right. These decoys as a lot only went for $500 at a 2003 Guyette and Schmidt auction. Photo courtesy of Guyette and Schmidt.
There are many other factories that made, and some still do make decoys. And there are many factory decoys available; some more collectible than others. Many were very utilitarian, others quite beautiful, some practical and some absurd. For example, on the practical side is the tinnie; a tin shorebird decoy that, when unfolded, would nest with others for ease of transport. When folded closed to form the bird, a stick was added to the body for deployment in the mud.
For the absurd, a decoy with a rubber tube and bulb running to the hunter in the blind. When he squeezed the bulb the decoy would quack! If you wish to explore this area of collecting further, excellent books on the subject include “American Factory Decoys,” by Henry A. Fleckenstein Jr. and “Mason Decoys, A Complete Pictorial Guide,” by Russ Goldberger and Alan Haid. Factory decoys provide an easily documented, satisfying collectible still at affordable prices.
Laura Collum is a Worthologist who specializes in decoys, nautical and scientific instruments

Wednesday, July 15, 2009

Magazine Articles Chronicle Circus Life of Yesterday and Today

Magazine Articles Chronicle Circus Life of Yesterday and Today
by Larry Kellogg (06/08/09).
http://http://www.worthpoint.com/

“Time” Magazine, March 29, 1937 – Wild Animal Trainer Clyde Beatty.

Stories featuring the circus have always been a popular subject for magazines. Collecting these magazines is an inexpensive way to add some spice and details to your Circus Collection. All of the most popular magazines of the past have regularly chronicled circus life. Weekly magazines like Saturday Evening Post, Life, Look and Colliers featured circus articles yearly—sometimes several times a year. Even Time, the first weekly news magazine, which began publication in 1923, featured circus stories, including at least three covers.

When I bought my first computer about 20 years ago, I started compiling a data base of magazine articles about the circus. Today that list contains more than 2,200 articles that have appeared in more than 550 different magazines. The copyrighted, 38-page document lists magazines alphabetically from Advertising Age to Youth’s Companion. Each magazine is further sorted chronologically. The list is constantly being updated as new articles are printed and old articles are discovered. It’s a good resource when going to antique malls or flea markets where large quantities of old magazines are being sold. You can purchase a copy of this Circus Magazine Articles Index, through WorthPoint here.

The oldest magazine article in my list appeared in The Illustrated London News in 1844 and tells about General Tom Thumb, Barnum’s diminutive discovery, and Mr. Carter, a lion trainer. The current list has 86 articles from the 1800s. But it’s also up-to-date. More than 90 circus articles have appeared in magazines since the year 2000.

“National Geographic” Magazines, October 1931 and March 1948.

There are many standout articles, such as the two appearing in National Geographic in October 1931 and March 1948. Both of these features were written by F. Beverly Kelley and are filled with black & white and color photos. Kelley joined Ringling Bros. and Barnum & Bailey in 1930 and worked in the publicity department throughout the 1930s and 1940s. His autobiography, “It Was Better Than Work,” was published in 1982. National Geographic has also published other circus and circus related articles, among them, an in-depth look at an old-time circus, Hoxie Bros., in a May 1972 feature. Most of these issues can be found for less than $10 each.

“Harper’s Weekly,” October 4, 1873 – "The Circus Coming Into Town" – Hand Colored engraving.

“Harper’s Weekly,” February 21, 1864 – “Wedding of Mr. & Mrs. Charles Stratton (General Tom Thumb)”.

Many of the articles from the 1800s were published in Harper’s Weekly. This magazine, called “A Journal of Civilization,” was published from 1857 to 1916. Among the most important circus articles were the accounts of the wedding of General Tom Thumb, which was featured on the cover, the burning of Barnum’s American Museum and the death of P.T. Barnum. A story in 1873 entitled “The Circus Coming Into Town,” included a classic cover illustration of a circus parade. Sometimes you can find issues where the engraving has been hand colored, as in the example shown here. Harper’s Weekly issues can be found for $5 to $10 with special issues such as the ones mentioned above bringing as much as $25.

“Life” Magazine, July 28, 1941 – “Wire Walker Hubert Castle and family.”

“Life” Magazine, April 8, 1946 – “World Famous Clown Lou Jacobs.”

Life magazine in its many incarnations is one of the best-known magazines of the past. Originally, it was a humor and general interest magazine first published in 1883. During the early years there were many circus covers by illustrators like Norman Rockwell, Leyendecker and Victor G. Anderson. In 1936, Henry Luce purchased the magazine and beginning in November of that year, it became a weekly news magazine with an emphasis on photos. It remained a weekly until 1972, and during those 30-plus years the magazine ran circus articles in more than 100 issues. Three of those issues featured circus covers. One of the saddest articles, “The Big Top Bows Out Forever,” told the story of Ringling Bros. and Barnum & Bailey’s final performance under the Big Top in 1956. Life magazines from the Henry Luce period are fairly inexpensive, except for the first issue (November 23, 1936), which sells for about $100. That issue has an article about the circus paintings of John Steuart Curry titled “Curry of Kansas.” Most of the other Luce-era magazines are $10 to $30 per issue.

Circus magazine articles provide valuable information for circus historians, and in some cases, incredible inspiration. In May 1952, Popular Mechanics published a story entitled “Here Comes the Circus.” The article featured a diagram of the Ringling Bros. and Barnum & Bailey 79-car circus train, a layout of the circus grounds and a figure illustrating the rigging and set up of the Big Top tent. A teenager named Howard Tibbals saw this article and it was part of his inspiration to build the largest miniature circus in the world. You can read about Tibbals and his Howard Bros. Circus in my article You Too Can Be A Circus Owner.

If you are serious about collecting circus ephemera, magazine articles from the past and the present will give you an inside look at this fascinating world. They are inexpensive and are widely available to collectors through yard sales, flea markets, antique malls, the internet and other sources. They are a valuable source of historical information.

Larry Kellogg is a WorthPoint Worthologist specializing in circus memorabilia


Sunday, June 21, 2009

The candlestick telephone

The candlestick telephone
by Suzanne Meredith
http://www.antiquetrader.com/article/The_candlestick_telephone/

The hazy view of advertisements and reality. Alexander Graham Bell had no idea what his communication device would turn into—or the effect it would have on civilization. Bell was born in 1847 and long before he perfected the telephone he developed an interest in speech, elocution, and voices. His belief that it was possible to transmit language at a distance led to extensive experiments spanning several decades using wires and electricity to carry sound.


Bell’s preoccupation with speech influenced his decision to teach deaf students, including Helen Keller. During this interval he devised new techniques to assist the deaf in comprehending and articulating words. His wife was deaf and although he had great compassion for those he considered “defective,” he also held views that were controversial but common at the time regarding limiting the propagation of those afflicted with “differences.”

While living in Canada he became intrigued with the language used on the Six Nations Reservation in Onondaga. Bell studied the Mohawk dialect and translated its unwritten vocabulary into Visible Speech symbols.

By 1876 the Bell Telephone Company was formed. Over the years there were many improvements and styles of phone designed, each one more popular than the last. In the early 20th century a memorable development in communication occurred: the candlestick, a table-top phone. Before this model, every phone needed its own battery system, included in a wood box attached to the phone. The batteries needed to be cranked to provide electricity for activation. When a central power system was developed it eliminated the need for the individual batteries and the smaller candlestick telephone became the must-have home accessory.


As it is with all change there were some folks who had reservations about this step into the future. The ability to instantly communicate thoughts was considered dangerous because intemperate words might be uttered. Telephone safety concerns included the spread of disease on mouthpieces. Catering to this germ driven health panic, manufacturers devised portable screw in mouthpieces to replace the bacteria laden publicly used speaker. Gauze phone covers were produced that were easy for people to carry and supposedly filtered out offensive contaminants. An inventive person came up with a dangerous idea for an item that produced a jolt of electricity to purify the surface of a phone, thus zapping all nasty bugs—and probably any human within range.

Truth in advertising has always been a hazy concept, as some of these postcards will show. The first card presents a beautiful, smiling woman in a frothy low cut frock dreamily speaking on her candlestick phone. In the companion real photo card an average couple sits with a treasured phone between them; neither of these two look particularly dreamy.

It has only been a century or so between Bell’s experiments and your cell phone. As time passed the telephone changed again and again until today, for better or worse, almost everyone who can talk is attached to a cell phone. Statistics advise that at least 75 percent of all Americans own cell phones, and this number falls far behind usage in other countries. Today’s devices do a lot more than permit talking at a distance; they offer music, games, Internet service, GPS and cameras. Transmission towers bloom on hilltops (sometimes vaguely disguised as a scraggly fir tree or flag pole), which is a far cry from Bell’s electric wire. Some people still fear health hazards from the wireless frequencies and excessive dependence on this new tool.

One of the cell phone’s most lasting legacies may be in the landfill. Candlestick phones can often be found in antique shops. Cell phones may not get the chance to become antiques. More 130 million of them are thrown away every year, adding to the thousands of tons of electronic garbage polluting the earth.

Bell lived until 1922, long enough to see his name become a household word. Recognized as great thinker, he had an interest and inventions in aeronautics, the creation of principles in metal detecting and air conditioning, solar heat, protecting the environment and conservation of national resources. He is also credited with the common use of the word “hello.”

Today the candlestick phone is a sought-after antique, with collector clubs and Web sites devoted to the study and preservation of this intriguing piece of Alexander Graham Bell’s history.

Postcards were sent for nearly every holiday, and often the subject of the early cards was using a candlestick phone.

Technology may have changed but human nature has not – listening in on a party line was an early form of hacking. A party line was a system where two or more families shared the same phone line, similar to having an extension in each home in the neighborhood. The ring for each house was different but anyone could pick up the phone and hear what was being discussed by other users. In 1912 a newspaper article sported headlines regarding the situation:

“RESIDENTS ABUSE ‘PHONE PRIVILEGE.’ Party Line Patrons Have Trouble When Neighbors Form the Practice of Listening!” “We are all of the opinion that the telephone has proved to be a blessing in many ways. But we often think that the evil use of it more than offsets any good it can do. What kind of an example is it to our children to see a family member listen in on a neighbors’ conversation, stealing their privacy! It is dishonesty!”

Monday, May 25, 2009

The Exquisite Needlework of Appenzell Embroidery

The Exquisite Needlework of Appenzell Embroidery
by Lynda Kolski (01/05/09).
http://www.worthpoint.com/blog-entry/exquisite-needlework-appenzell?utm_source=Publicaster&utm_medium=email&utm_campaign=insider-2

Some of the finest white-on-white hand embroidery comes from a small town at the foot of the Alps in northeast Switzerland. Named for the town where it originated, Appenzell embroidery has been produced since the late 1700s.

These towels are nice examples of Appenzell embroidery, although because they are only floral without any figures, they are not as highly desired.
Through the 18th and 19th century, this exquisite needlework was done by hand by thousands of women working at home. The industry flourished during the early 1900s, when some of the best work was produced. Today, there are only a few embroiderers who continue to do this fine, time-consuming needlework. Strolling down the main street of Appenzell today, by the many early homes, you can look up at the rows of windows that provided bright daylight for the upstairs workshops and imagine the women bent over their embroidery hoops creating beautiful heirloom pieces.

Buratto work fills the center of the flower.
Appenzell is usually done on a fine Irish linen fabric with linen embroidery thread. The background consists of Buratto work, which is a grid or net type of needlework. True Appenzell embroidery will have lots of tiny five-petal flowers. The embroidery consists of a very fine satin-stitch embroidery and delicate seed stitches that are so tiny and exquisite, it’s hard to imagine it was done by hand. In fact, often women doing the embroidery worked under a magnifying glass. The satin stitching is used as a filer for various parts of the embroidery from full figures to the smallest flourish, or as a fine scallop along the border. Although Appenzell is considered whitework, often pieces will have a soft gray, silver or light blue shadow, which accents the fine stitching. In addition, the borders often are highlighted by a row or two of fine hemstitching.

Notice the tiny seed stitches in the bottom center of this towel.
Figures are commonly found in Appenzell embroidery, ranging from Victorian couples in all their finery to hunt scenes, or, less commonly, battle scenes. Sometimes children are depicted, or just a man or woman’s head. Pieces with figures are more desirable than, for example, a piece with just an urn of flowers, which is another common theme.
Appenzell embroidery is becoming harder and harder to find. It is also difficult to accurately identify a piece of true Appenzell, since similar types of work were done in other parts of Europe, particularly during the early 20th century. The most accurate way to verify a piece as true Appenzell is if it still carries the original label or tag. Since most labels were removed, however, it’s rare to find a piece with the label still attached. Most textile experts refer to pieces as Appenzell-style or Appenzell-type if the origin cannot be documented.


Delicate, five-pedal flowers are characteristic of Appenzell embroidery.
Lynda Kolski is a Worthologist who specializes in early linens and textiles.

Saturday, May 16, 2009

Hey buddy, got a light?

Hey buddy, got a light?
by Alan M. Petrillo_
http://www.antiquetrader.com/article/Buddy_got_a_light_vintage_lighters/
A Dunhill 1950s Standard Unique Table Model, silver plated and engine turned with an engraved name on the base. All photos courtesy of International Vintage Lighter Exchange.
At one time, when smoking cigarettes was much more popular than today, nearly every other person carried either matches or a cigarette lighter.


While there are a lot fewer smokers today than in years past, vintage cigarette lighters still are attracting attention, but now as collectibles.
Rich Weinstein, owner of the International Vintage Lighter Exchange in Hendersonville, N.C., (http://www.vintagelighters.com/), says that cigarette lighters have been collected for more than 60 years, often because people simply liked them.

A very rare Ronson 1930s Kingcase with Watch, done in Tortoise Enamel and Dureum Plate.

“Smoking was so popular back then that it was a necessity to have lighters, whether they were carried in your pocket or placed on tables in your home,” Weinstein said. “What seemed to have sparked the interest in collecting came after the advent of butane lighters, which changed the look and functionality of fire-making devices. When something seems to be going out, people become nostalgic for the ones they remember and start searching for ‘vintage lighters.’”


Weinstein noted that with lighters, as with most mechanical devices, one can follow the changes over time that they went through, how the advances in technology affected them and “marvel at the ingenuity of the people who designed them.”

Yvonne Saldate-Auld, owner of the Atlanta Antique Gallery in Chamblee, Ga., (http://www.atlantaantiquegallery.com/), considers reminiscence as playing a large part in collecting vintage lighters.

“Like many other collectibles, vintage lighters are popular because they remind people of a bygone age,” Saldate-Auld said. “In addition, people admire the craftsmanship of older lighters, and when the lighters are made in the shape of animals, airplanes and other objects, they have a broad crossover appeal with other collectors.”

Weinstein believes that Zippo lighters have attracted the most attention from collectors.


“There are thousands of Zippo collectors worldwide and Zippo has its own club that helps promote the collecting of their lighters,” he said. “Second in popularity is Ronson, a lighter with an extremely long history dating from the early 1900s through the 1980s. There are many collectors who specialize only in Ronson lighters.”

Weinstein said that one of the greatest achievements in Ronson collecting was the publication of a book written by one of the foremost Ronson collectors, Urban Cummings.

“His 1993 book, ‘Ronson — The World’s Greatest Lighter,’ spans Ronson from 1913 to 1966, and these were the most prolific years for Ronson,” Weinstein pointed out. “The book helped collectors all over the world understand and enjoy the history of Ronson.”

The third most popular lighter among collectors, Weinstein said, is made by Alfred Dunhill of London. Best known for their art in lighter manufacturing, Dunhill catered to the elite as well as the regular smoker.

For the elite, Dunhill produced thousands of lighters with artistically-crafted enameling by some of the great craftsmen of their time, many of which were adorned with watches and made of precious metals. For those interested in Dunhill, the book, “The Dunhill Petrol Lighter, A Unique Story” by Luciano Bottoni, has more than 500 color photos and plenty of information on Dunhill lighters.

Mathew McLoughlin, a cigarette lighter collector and dealer associated with Saldate-Auld’s Atlanta Antique Gallery, said that cigarette lighters can run the gamut from simple flint and spark wheel mechanisms to the piezo ignition system lighter.

“Lighters with advertising slogans are very sought after by collectors,” McLoughlin said. “Companies used cigarette lighters to promote other products and gave lighters away as promotional items. Collectors are always keen to acquire these lighters to complete their collections.”

Another popular style with collectors, he pointed out, is the novelty lighter. Such lighters come in many shapes, some whimsical, such as toys or animals, and some even emit flashing lights.


“It’s interesting to note that several states have banned the sale of new novelty lighters since they appeal to children and pose a potential hazard,” McLoughlin said. “This will likely make vintage novelty lighters more sought after.”

McLoughlin noted that after the Second World War ended, the sale of lighters was led by the Japanese lighter industry.

“Between 1945 and 1952, all lighters produced in Japan were marked ‘Made in Occupied Japan,’” he said. “Today, these lighters, like the trench art and early Zippos, are regarded as relics of an era in recent history and are highly prized by collectors.”

Weinstein of International Vintage Lighter Exchange believes that fine collectible cigarette lighters are becoming harder to find.

“Each time one is bought, it reduces the availability,” he said. “Since there is a finite amount of these, scarcity is inevitable. It’s much harder to find a great, old lighter these days than it was 20 or 30 years ago.”


However, he’s sold some rare and exotic lighters in recent times, including a Dunhill enameled lighter with attached cigarette case that sported an enameled scene of Napoleon and Josephine that went for more than $15,000.

Another of his more memorable lighters sold was an extremely rare Dunhill table lighter with attached cigarette box in sterling silver called the Dunhill Pagoda that sold for $6,500. Also, Weinstein sold a rare Ronson lighter hidden in a walking stick for $3,500.

“But remember,” he pointed out, “most lighters will sell in the $20 to $100 range, so this hobby is available to many.”

Friday, May 8, 2009

Transferware china: Blue Willow is just the beginning

Transferware china: Blue Willow is just the beginning
May 06, 2009
by Mark A. RoederSummary
http://www.antiquetrader.com


Detail of transferware pattern. All photos submitted by Mark Roeder.


Transferware china is among the most beautiful china ever produced. It’s highly collectible and often highly valuable, but affordable pieces can still be found. Just what is transferware? Transferware is any pottery with decorative elements applied by transferring a pattern from a copper plate to paper and then to the pottery itself. Transfer prints are found on china, ironstone, and porcelain. There are tens of thousands of transferware patterns, but one of the most recognizable and most common is Blue Willow.


While blue is the color most commonly associated with transferware, it was produced in other colors. Some of these include red, pink, purple, cranberry, brown, black, green, yellow, gray and various shades and combinations of these colors.

While highly collectible today, transferware was originally a cheap alternative to expensive imported pieces from China. It first appeared in the late 18th century, but became extremely popular in the 1820s and 1830s. Transferware has been made continuously since that time. Most of the transferware found today was produced in the last 50 years, but earlier pieces are out there. The earliest transferware I’ve located dates to the 1820s or 1830s. This isn’t surprising as earlier transferware was produced in much smaller quantities. As a general rule of thumb, the earlier the piece, the higher the price, but this doesn’t always hold true. Condition plays a large role, of course. I purchased a damaged, unmarked, transferware cup dating from the 1830s at a local auction for $8. The price was low because the cup had a couple of old chips and a crack. I purchased it for the beautiful transferware pattern in lavender. The cup had no handle, which is typical of early cups.

Like many, my first introduction to transferware was Blue Willow. The pattern is the most widely recognized and probably the most common as well. I was attracted to its deep blue color and attractive pattern. While many pieces of Blue Willow were out of my price range, others were far more affordable. I own some vintage pieces from as early as 1910, but most of my collection is of far more recent vintage. The beauty of Blue Willow is that old and new can be easily mixed. I actually use a set of this transferware china as my everyday dishes. I purchased an eight place setting of newer Blue Willow at an auction for only $50! That’s far cheaper than most new sets.


The Blue Willow pattern tells its own story. There is more than one variation of this tale, but each tends to flow along the same lines. As the tale goes, long ago, a Chinese Mandarin, lived in a wonderful pagoda under an apple tree on the right side of the bridge seen in the pattern. He was the father of a beautiful girl, who was the promised bride of an old but wealthy merchant. The girl, however, fell in love with her father’s clerk. The lovers eloped across the sea to the cottage on the island. Her father pursued and caught the lovers and was about to have them killed when the gods transformed them into a pair of turtle doves, seen at the top of the design.

The Blue Willow story is a nice tale, but it has no real basis in fact. The pattern was not created to tell the story. Rather, the story was told after the pattern was designed. The tale isn’t Chinese either. According to different sources, it is either British or American in origin. The tale is no more than a 19th century merchandising scheme. Blue Willow itself didn’t even originate in China. It was created in England. An estimated 90 percent of older Blue Willow was made in the Staffordshire county of England, but it was also produced in other areas of Great Britain. The British Isles do not have a monopoly on Blue Willow. A great many pieces produced after 1930 were made in Japan and various other parts of the world.

Blue Willow is only the beginning, however. Over the years I’ve purchased pieces from several of the tens of thousands of patterns available. There are some real buys out there, especially if one doesn’t mind a bit of damage. At a local auction, I picked up two 19th century soup bowls in the Asiatic Pheasants pattern. Both bowls were cracked, but still useable and I got the pair for only $2! I use these as cereal bowls on an almost daily basis. Using such damaged pieces allows me to actually use antique china without the cost or worry of breakage that comes with undamaged pieces. If they were in excellent condition, my bowls would cost upwards of $40 each.

Dating transferware can be difficult. Many of the early pieces are unsigned. Many patterns made in Great Britain between 1842 and 1883, however, were registered with the Patent Office in London. The registration marks on the reverse of these pieces can be dated. British transferware made between 1890 and 1920 usually has “England” printed on the back. After 1920, the mark became “Made In England,” I’ve noted that older transferware often has richer and more plentiful color than later pieces. Manufacturers of more recent pieces tend to skimp on the amount and quality of color. This varies greatly with the manufacturer, of course, but it is another clue to age.

Values for transferware vary greatly. Early or rare pieces can run into the thousands of dollars. Price tags in the hundreds are not uncommon, but there is a great variety of transferware available in the under $100 price range. Common pieces of recent vintage, such as plates, can be quite affordable. I’ve often sold such pieces myself at flea markets for $10 or less and I regularly spot similar examples for under $25.

Transferware can be found anywhere other antiques and collectibles are located. One good source is the household auction. Very early or rare pieces don’t usually turn up at such sales, but this is a good source for more common pieces. They can sometimes be purchased in partial sets for very reasonable prices. I’ve spotted a few good buys on eBay, too, and as usual, eBay offers quite a selection. Keep in mind the cost of shipping and insurance if buying on eBay, however, as they can significantly added to the cost. Don’t expect to find great bargains, as they are definitely the exception and not the rule. Don’t let price tags in the low hundreds scare you off, though. While much transferware is quite costly, there are a great many affordable pieces out there.

Transferware is some of the most beautiful china available. Single plates and serving pieces are great for display. Partial sets are attractive on plate racks and in china cabinets. Don’t forget to make use of your transferware pieces, too! Damaged examples, common items, and pieces of recent vintage are all wonderful for everyday use.

Whether you collect a china cabinet full of transferware or just a few pieces, you’ll find it a beautiful, nostalgic, and useful collectible that will bring you pleasure for years to come.

If you haven’t collected transferware before, give it a try. I guarantee it will add to your collecting enjoyment.


Mark A. Roeder is the author of two nationally syndicated columns on antiques, Successful Antiques Collecting and Spotlight on Antiques & Collectibles. His expertise comes not only from researching antiques, but from collecting, buying, and selling them for more than three decades.