Well my husband came home today and not as his usual self. He prepared to tell me that he got laid off from his job of 8 years. Now I am not crying the blues to anyone since I just wanted to share how they did it to him.
He was a deli manager for the grocery store and worked very hard there for 8 years. He gave his all to his job, never took off, went in on the snow days, all of them even when I begged him not to. He had to do inventory every month, do 3 truck deliveries a week, make the chickens, salads sandwiches with hardly no help as the boss kept cutting the help down to a mere minimum.
The hub had to go in on his days off cause there was no one working when someone called out sick. He went in even when he said no. He would call back and say okay. He was loyal and dedicated to his boss.
Well today the boss (smaller boss) gave him the news that they had to let him go. They recently closed down 2 stores and this last store the manager had no place to go so the (big boss) gave him my husbands job. No 2 weeks notice, no severance pay, no how by you. Just a sorry but I have to do this. Now I must tell you my husband is not a young man, he is 77 and worked hard every day 5 days a week, he put many young men to shame by the way he worked.
This boss always wanted his employees to give him 2 weeks notice but he never did anything like that for his employees. He just fired them without so much as a notice. Well he did the same to my hubby who was so hurt by this. His (smaller boss) did shed tears as he didn't want to lose him nor let him go this way, but he had to do what was told to him after all he could lose his job also.
My husband was just so hurt by the way they did this to him. Its not the losing of the job but the way he was treated. He puts his hope and trust in God not man and will not worry for lack of monies cause he believes as well as I that God will take care of our needs, He will provide.
I just wanted to share this with you my readers to let you know that anything can happen in todays world, so take care of yourselves, put as much money away as you are able to and trust in the Lord with all your hear and lean not on your own understanding. Our God can do all things that are possible for Him for us!
Saturday, September 13, 2014
Wednesday, January 1, 2014
Happy New Year
Happy New Year to you all. May this coming year bring you many blessings, prosperity and health. I have been so busy this past year and have neglected all my friends and acquaintances. I have been eliminating my ecrater stores as they were just not going anywhere. I am still eliminating as I have hundreds of items to move over to my new stores.
I now am back with eBay and am loving it more and more everyday. They really have changed to the good, good for the buyer and good for the seller. I also have re-opened my old Bonanza store, which is still a loser in my eyes at this time but it makes for a great storage place and keeps my items where I can find them, if I ever sell anything there it would be a plus for me.
My etsy store has slowed down some but it was my own fault as I was giving eBay all my attention. This new year I will devote equally to all my stores.
 Come and visit me and if you see anything that would enhance my stores do critique me in a loving way. Here are my store's url:

 I sell a lot of vintage clothing on both eBay & etsy as well as newer items for both men & women, also other items such as: toys, men clothing, kids clothing, home collectibles & more to come! On Bonanza right now its mostly magazines, some women clothing and more to come also. So enjoy you New Year and come and give me a shout!
Back Street Style
Out Of The Attic 2U
Out Of The Attic 4U
I now am back with eBay and am loving it more and more everyday. They really have changed to the good, good for the buyer and good for the seller. I also have re-opened my old Bonanza store, which is still a loser in my eyes at this time but it makes for a great storage place and keeps my items where I can find them, if I ever sell anything there it would be a plus for me.
My etsy store has slowed down some but it was my own fault as I was giving eBay all my attention. This new year I will devote equally to all my stores.


Back Street Style
Out Of The Attic 2U
Out Of The Attic 4U
Saturday, March 16, 2013
Bamboo, rattan, wicker or rush? How to determine seat composition
Bamboo, rattan, wicker or rush? How to determine seat composition
by Fred Taylor.
http://www.furnituredetective.com/
This is such great information that I just had to share from Fred Taylor. You can read about his expert advice over at
The third edition of the Antique Trader Furniture Price Guide is filled with completely new listings covering all types of American and European furniture from the 17th century through the late 20th century. Learn more at shop.collect.com.
Old chairs very often have seating material that is – well you know – that woven stuff that comes in old chair seats. It’s not fabric, it’s not leather, it’s not cowhide, it’s what exactly? If you can’t identify the material off the top of your head, then your next move must be to determine what it is not.
Bamboo
More likely than not, it is not bamboo. Bamboo is what old fishing poles look like, brownish with large segments and obvious growth joints every 10 inches or so. Some furniture is made of bamboo, which is bent to shape and wrapped with natural fiber binding or leather strips to secure the joints, but usually the seating portion is upholstered or has a loose cushion on it because bamboo is not very comfortable. So unless you are sitting in a bamboo chair, you don’t have a bamboo seat.
Rattan
What it also probably isn’t is rattan. Rattan is the stem of a type of tropical palm tree most often found in commercial quantities in Borneo. The stem has its leaves removed and the outer skin scraped off. It can then be bent to shape to make furniture. Larger pieces are steam bent and smaller ones are merely soaked to provide flexibility. Larger pieces of rattan look like bamboo with the hard outer shell removed and rattan furniture closely resembles bamboo furniture. It also usually has wrapped joints but in newer pieces the wrapping is often plastic made to look like leather or fiber but actually conceals a nailed or screwed joint. Seating in rattan closely follows the pattern of seating in bamboo furniture.
Wicker
Perhaps it’s wicker. Perhaps. Wicker furniture has been around for centuries, and some of it is actually quite sturdy. Old wicker is made of small diameter (1/4 inch or less) but long lengths of willow or small rattan palms. These lengths are wrapped around a structural frame of maple or birch to create the impression of a woven piece of furniture which often features elaborate embellishments made of individual stems rolled or curled in patterns. This type of wicker furniture is all hand made and is relatively expensive.
On the other hand is “paper” wicker. This is a 19th century invention of brown craft paper wrapped tightly around a wire core and can be woven on a special loom in a factory, which accounts for the proliferation of Victorian wicker around the turn of the 20th century. But again, wicker is almost never used as seating material except in a wicker piece of furniture.
Rush
Rush is a seating material made by twisting some substance into long strands of about the same diameter as wicker. It is then woven in a pattern around the top stretchers of a chair seat, creating a type of suspension seat with no wood visible around the seat. In some chairs it is woven around a flat wood frame, which sits inside another frame in the chair. Rush, like wicker, comes in two basic varieties. The original form was made of very tightly twisted wet cattail leaves and gets very brittle after a number of years. This is called “natural” or “cattail” rush. The newer version, euphemistically called “fiber” rush, is similar to paper wicker in that is essentially twisted brown or variegated craft paper but without the wire core. It usually requires a top coating of some sort to protect it from moisture. Many newer pieces of furniture imported from the Far East are once again appearing with natural rush in the seats.
Cane
Cane is just that – cane. It is the outer skin of cane cut in very thin flat strips that can be woven almost like fabric to make a seat surface. In woven form it is very durable and has been known to last centuries. An earlier form of cane seating is called “seven strand hand cane,” “hand cane” or “hole cane.” After soaking in glycerin or water, seven (more or less) individual strands are woven in and out of holes drilled through the wood of the seat, creating any number of patterns. If you turn the chair upside down you can see the loops of cane under the seat going from hole to hole. The most common pattern has a series of octagonal-shaped holes in the material. After installation and drying, the cane can be stained and finished to match the chair or to match other older seats within the same set. This type of hand work is relatively expensive and fewer people in the U.S. do it every year. It is a dying art here but is still common in European produced furniture.
Another type of cane is called “sheet cane” or “pressed cane.” This comes from the manufacturer (in the Far East) in prewoven sheets in a variety of styles and sizes and is installed in a groove cut near the edge of the seat. It is worked wet after soaking awhile so that as it dries it becomes very tight and strong across the seat opening. It is held in place by a glued-in border called reed spline. Since it has no holes drilled through the seat it leaves a stronger seat frame than does hole cane. It too can be finished to match something else. The newest twist in cane seating in inexpensive furniture is paper cane. It looks exactly like natural cane except it is made of woven flat strips of paper imbedded with a nylon cord to give it strength and is finished to look like real cane.
So, what do you have in your chairs? ■
You might also enjoy these articles:
• Proper antique furniture vocabulary
• Depression furniture offers outstanding value
• Stickley Bros. may be behind 'Quaint' furniture
• Furniture Detective: Appreciating veneer
• Mahogany remains the red king of furniture
Send your comments, questions and pictures to Fred Taylor, P.O. Box 215, Crystal River, FL 34423 or info@furnituredetective.com. Visit Fred’s Web site: www.furnituredetective.com.
His book “How To Be a Furniture Detective” is available for $18.95 plus $3 S&H. Also available is Fred and Gail Taylor’s DVD, “Identification of Older & Antique Furniture,” ($17 + $3 S&H) and a bound compilation of the first 60 columns of “Common Sense Antiques by Fred Taylor” ($25 + $3 S&H). For more information call 800-387-6377, fax 352-563-2916 or info@furnituredetective.com.
March Madness
My God, where did the time go? I can't believe it is March and it is still snowing here! I thought by now we were finished with this white stuff, but no it is back with a fury. They said only about 1-3", yeah right! The way its coming down it might go way over that. Please tell me I am wrong! My girlfriend would always tell me every year small snow flakes, big snow, Large snowflakes little snow, well these babies are small flakes,
I am so wanting spring with the sun, flowers even rain with warm weather so it doesn't turn to ice, but no, just more snow. Now it does sound like I am complaining and yep that is what I am doing and so proud of it. What else is a girl to do but complain about what she doesn't like. Honestly I try liking it, well I do in a sense which is the very first snow fall, then I don't want to see it anymore, can you blame me?
Visit me at http://www.etsy.com/shop/outoftheattic2u


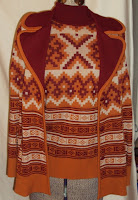

I am not even in the mood to list my spring and summer fashions as it is too cold to even think about them. So I will show you some of my winter stuff instead as that is what it looks like out there!
I am so wanting spring with the sun, flowers even rain with warm weather so it doesn't turn to ice, but no, just more snow. Now it does sound like I am complaining and yep that is what I am doing and so proud of it. What else is a girl to do but complain about what she doesn't like. Honestly I try liking it, well I do in a sense which is the very first snow fall, then I don't want to see it anymore, can you blame me?
Visit me at http://www.etsy.com/shop/outoftheattic2u


Thursday, December 27, 2012
New Beginnings
This past year had many surprises for me. Ups and downs like a roller coaster, some good, some bad, and some on even keel. I sell on line as most of you know and have 12 twelve stores. This coming New Year I am making a change. Each store had their own niche which is suppose to be a good thing. Well I must say it might be good for a little while but after a while it takes its toll.
This New Year I am letting quite a few go. I already closed up my Artfire shop, Webstore store, Ruby Plaza Store, and Ruby Lane store. My stores on ecrater will also be let go, they will be combined into possibly 3 stores as I have 7 ecrater stores. The store that I am keeping will be my etsy shop. It may cost a few dollars a month to keep up, but its worth it. I made a lot of friends in the few months that I have been selling there. I have been there since 2007 but more as a buyer, tried the selling at that time and wasn't in favor of it. Times change, people change and venues change.
My etsy shop deals mostly with vintage clothing, accessories and possibly will be adding costume jewelry since I am thinking of closing retro glitz on ecrater. These have been tough decisions for me as I always liked the challenge, but since I have been re-thinking my act, I want some peace and rest so I can enjoy what I do and that is selling, second best is buying. I will be be able to focus better on a few stores instead of the 12. Better listings, better pictures, more time for discussions, searching and having a life. This is going to be tough as I have these ecrater stores more than 5 years and so which ones must I let go.
I know I will be keeping katzzkloset, Outoftheattic2u and cutsie kids. Katzzs Kloset is an all around store with a variety of products, and Cutsie Kids is just for kids and toys. So that leaves my Twice Over Books N More, Bamboo Hutch, Retro Glits, and Vintage Rose Collectibles. I already have moved some over from the glass store and the pottery store.
The books and accessory stores are a hard one for me. On etsy it is only vintage or antiques and both these stores have newer items that are less than 20 years old and cannot be added to this venue. So it will be tough but I know in the end I will find a way and go on.
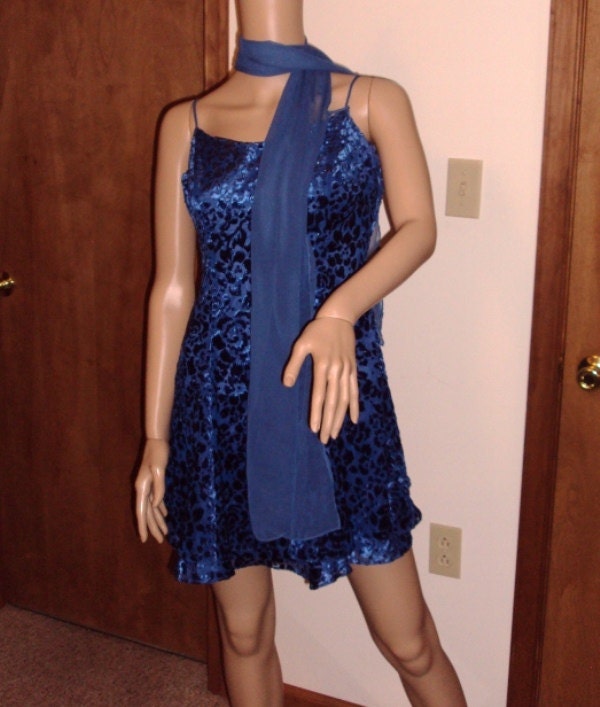
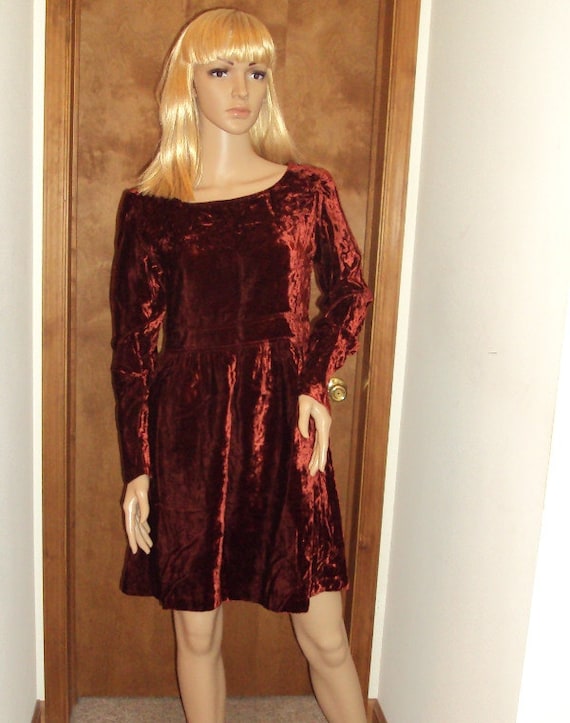
Here are some vintage clothing from my etsy store.

Come and visit me and if you have any suggestions, let me know!
http://www.etsy.com/shop/outoftheattic2u
This New Year I am letting quite a few go. I already closed up my Artfire shop, Webstore store, Ruby Plaza Store, and Ruby Lane store. My stores on ecrater will also be let go, they will be combined into possibly 3 stores as I have 7 ecrater stores. The store that I am keeping will be my etsy shop. It may cost a few dollars a month to keep up, but its worth it. I made a lot of friends in the few months that I have been selling there. I have been there since 2007 but more as a buyer, tried the selling at that time and wasn't in favor of it. Times change, people change and venues change.
My etsy shop deals mostly with vintage clothing, accessories and possibly will be adding costume jewelry since I am thinking of closing retro glitz on ecrater. These have been tough decisions for me as I always liked the challenge, but since I have been re-thinking my act, I want some peace and rest so I can enjoy what I do and that is selling, second best is buying. I will be be able to focus better on a few stores instead of the 12. Better listings, better pictures, more time for discussions, searching and having a life. This is going to be tough as I have these ecrater stores more than 5 years and so which ones must I let go.
I know I will be keeping katzzkloset, Outoftheattic2u and cutsie kids. Katzzs Kloset is an all around store with a variety of products, and Cutsie Kids is just for kids and toys. So that leaves my Twice Over Books N More, Bamboo Hutch, Retro Glits, and Vintage Rose Collectibles. I already have moved some over from the glass store and the pottery store.
The books and accessory stores are a hard one for me. On etsy it is only vintage or antiques and both these stores have newer items that are less than 20 years old and cannot be added to this venue. So it will be tough but I know in the end I will find a way and go on.
Here are some vintage clothing from my etsy store.
Come and visit me and if you have any suggestions, let me know!
http://www.etsy.com/shop/outoftheattic2u
Wednesday, October 31, 2012
After The Storm
Well Sandy came and went thank God. It was the longest night I have faced in many years since I left Florida to live in PA. I had gone thru many hurricanes for over 35 years and went thru the storms without much fear like I had here.
I live in the higher altitude area in the mountains and am surrounded by huge trees. Its the trees that had me scared out of my wits. I have such a vivid imagination and was seeing all the tress landing on my house, crunching me in the bed in the dark of the night. We lost our electricity for 24 hours and that was a miracle in itself that we got it back so fast, yes 24 hours is fast for me. I remember in Florida that it was days before we had electric.
Well I can gladly report back to you all that not one tree fell, though it sounded like they did because of the crunching noises and howling winds. All that fell were a few small branches and that is also a miracle since at times when we had winds a lot more branches fell then what this storm did, go figure?
Now I have so many emails to catch up on and not enough time in the day since I have to clean out the refrigerator with all the bad food, than the good Lord my freezer food is intact. I do feel for the surrounding areas like NY, NJ, Staten Island as they are my close neighbors and all the damages they had and the recouping of homes, cars, boats and life in general. I have many friends and family in the states I have mentioned and I thank my God that all is well with them! My prayers go out to those that have severe damage and that they will be healed thru all this and get back all that this storm took from them and I pray that in the name of Jesus who is the God of the impossible.
Saturday, October 6, 2012
First Time For Me!
One of my items has been picked for a Treasury on etsy called Fall Weekend getaway. The curator:is JoyfulMoonDesigns I am so excited to have a spot on her treasury. It makes me feel good that someone out there appreciates nice vintage clothing, well at least one of my pieces.
Here is the link in case you all are curious as to what is featured, not just mine but everyone she has picked.
Fall Weekend Get A Way I just had to share some of my good news to you my friends.

Vue Point Velvet Bolero
Here is the link in case you all are curious as to what is featured, not just mine but everyone she has picked.
Fall Weekend Get A Way I just had to share some of my good news to you my friends.
Vue Point Velvet Bolero
Subscribe to:
Posts (Atom)